Day 4 was rained out. There was rain from the ramp. There was rain from the old drips that had been sealed. There was rain in brand new places. After moving my studio mates canvases out of his area to keep from getting wet or to dry out. I was too distraught really to anything in my studio.
There are so many things that I love about my space, but it all is forgotten when I have to deal with this much water or my own continuous stream of sweat. It seems that I am being chased by water. My lease is up this month, so I'm officially looking for new digs. I need a space that supports me and that doesn't distract me.
Wednesday, September 8, 2010


Tuesday, September 7, 2010
Day 3
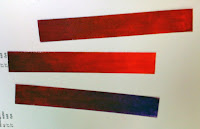
I got a better offer from my husband on Day 3. We spent a lovely day together. But while he was napping, I snuck up to the studio and looked at the results of my dye studies. I didn't get the blue-green I was looking for, so I'll be doing more studies. I came really close on the red-violet and cool-red that I think I can adjust and be happy with the result.
Now the juggling begins. I could mix up dye for both one of the pieces and the studies on Day 4, but I'm only going to have time to rinse out one on Wednesday night. So, I'll have to choose and be patient!
Now the juggling begins. I could mix up dye for both one of the pieces and the studies on Day 4, but I'm only going to have time to rinse out one on Wednesday night. So, I'll have to choose and be patient!
Monday, September 6, 2010
Day 2

These are two different reds mixed into yellow dye at 10% increments.
I also emptied out the front part of my studio to make room to dye the large pieces of fabric. I knew this day was coming....


So, the ramp is filling up. I need to get some more metal shelving to create stair steps up on the left side. There will be a day, I'm sure, that I will be in the mood to organize, and I'll have the perfect project!

I'm excited to see how my idea eventually plays out. There are four possible outcomes.
1. The fabric comes out exactly how it is in my mind.
2. The fabric comes out differently than I am imagining it, but I can still use it for this project.
3. The fabric comes out differently than I am imagining it, and I can't use it for this project, but possibly it can be used for something else.
4. The fabric comes out differently than I imagined and it can't be used for anything!
Sunday, September 5, 2010
Day 1
My plans for the day were to quilt on one of my pieces for my Jane class and then work on another piece of my Jane class. But when I got to the studio, I thought I have 4 days in a row (which seems big to me now!) and I have these color shift ideas that I'm seeing big.
So, I decided to push things a bit and start something brand new, knowing that I would fill in with my Jane work. Starting something big and brand new, not playing it safe with my homework, and not playing it safe by choosing not to work at the day job on Monday all contributed to accessing my adventure value. That was why I was so pumped yesterday. Note to self.
I used to access my adventure value by travelling alone and doing other fun stuff like canoeing and camping on the river overnight by myself. Clearly, I am getting old if living on the edge is pushing deadlines and missing a paycheck for a day!
 I mentally went through a check list of how I was going to proceed and then decided to actually write down these choices. What was different for me is that I chose the easiest option for each item.
For these quilts--I see two that are playing with each other--I am using cotton because it is less slippery than silk and easier to manage the way I'm handling the finishing.
I chose wool batting because it is the loft that I want and is so easy to cut and hold its shape. The other choice I have been using lately is easy, too--felt.
I chose invisble thread as I didn't want to work about matching subtle color shifts. And I know I'll make other choices in the future for thread, both color matching and color contrasting.
The sizes that I chose are skinny enough to not have to sew pieces of fabric together. That choice was made for simplicity sake.
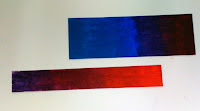
 The colors were tough to choose. I could sketch and visualize the shapes of the quilts in my head, but not how the colors would play with each other. So I painted several varieties.
So, I decided to push things a bit and start something brand new, knowing that I would fill in with my Jane work. Starting something big and brand new, not playing it safe with my homework, and not playing it safe by choosing not to work at the day job on Monday all contributed to accessing my adventure value. That was why I was so pumped yesterday. Note to self.
I used to access my adventure value by travelling alone and doing other fun stuff like canoeing and camping on the river overnight by myself. Clearly, I am getting old if living on the edge is pushing deadlines and missing a paycheck for a day!

For these quilts--I see two that are playing with each other--I am using cotton because it is less slippery than silk and easier to manage the way I'm handling the finishing.
I chose wool batting because it is the loft that I want and is so easy to cut and hold its shape. The other choice I have been using lately is easy, too--felt.
I chose invisble thread as I didn't want to work about matching subtle color shifts. And I know I'll make other choices in the future for thread, both color matching and color contrasting.
The sizes that I chose are skinny enough to not have to sew pieces of fabric together. That choice was made for simplicity sake.

 The colors were tough to choose. I could sketch and visualize the shapes of the quilts in my head, but not how the colors would play with each other. So I painted several varieties.
I n the past, I would have just jumped in mixed up some dye and threw it on the fabric and hoped for the best. But I guess I value good results more than fast results, because not only did I do paint studies, I also did dye studies, which is really going to take time. Two of these are ones that I had to do anyway for my independent study. I can rinse these at the end of Day 2. Make decisions based on the colors at the beginning of Day 3. Batch the first piece of fabric on Day 3 and rinse on Day 4. If all goes well, batch second piece of fabric on Day 4 and rinse after day job on Day 5.
 n the past, I would have just jumped in mixed up some dye and threw it on the fabric and hoped for the best. But I guess I value good results more than fast results, because not only did I do paint studies, I also did dye studies, which is really going to take time. Two of these are ones that I had to do anyway for my independent study. I can rinse these at the end of Day 2. Make decisions based on the colors at the beginning of Day 3. Batch the first piece of fabric on Day 3 and rinse on Day 4. If all goes well, batch second piece of fabric on Day 4 and rinse after day job on Day 5.
Thursday, September 2, 2010
Art Quilt Finishing Techniques
I just wanted to share my latest finishing technique that I have used. Finishing techniques seem to be one part of the process that I experiment a lot with. I have have been very innovative in this area, and many successes, but there are a few that I haven't gone out of my way to use again.
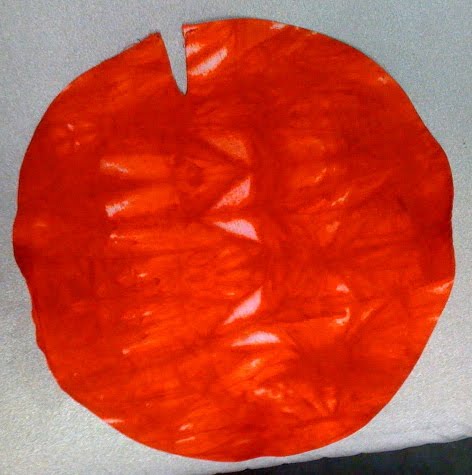
The piece that I'm showing here is a small custom piece that I made for one of my collectors. She specifically wanted a red circle quilt. I ended up using red felt, so even though it is stitched, it isn't officially a quilt.
I had several ideas of how to finish this piece including a shadow frame, (which I didn't offer because it would take away from the roundness that she desired), mounting it on a square piece of plexiglass, and floating it on a fabricated plexiglass mount, similarly to how I mounted Three Waters. It was important to me that it was away from the wall.
My collector thought of using the embroidery ring, which was a very inexpensive alternative that I hadn't considered. I covered it with fabric and then mounted the piece. The embroidery ring has a built in hanging device.
It is actually the same idea (smaller scale and different shape) that I had picked up at Translations Gallery, when they were more involved with fiber media, the last time I was in Denver. They had the flat quilts by their featured artist carefully pinned to black fabric covered stretcher bars that were a couple of inches smaller than the quilt. It allowed the quilt to come away from the wall maybe an inch, but I think it gave the piece more of a presence.
I'll be leading a discussion in my studio on Saturday, September 25. 2010 from 10 until noon on this very subject! It is called Art Quilt Finishing Techniques--A Discussion. I will be talking about lots of different options, what to consider when choosing, pros and cons, and hopefully talking about specific projects that participants bring in. It should be very informative and a lot of fun.
The piece that I'm showing here is a small custom piece that I made for one of my collectors. She specifically wanted a red circle quilt. I ended up using red felt, so even though it is stitched, it isn't officially a quilt.
I had several ideas of how to finish this piece including a shadow frame, (which I didn't offer because it would take away from the roundness that she desired), mounting it on a square piece of plexiglass, and floating it on a fabricated plexiglass mount, similarly to how I mounted Three Waters. It was important to me that it was away from the wall.
My collector thought of using the embroidery ring, which was a very inexpensive alternative that I hadn't considered. I covered it with fabric and then mounted the piece. The embroidery ring has a built in hanging device.
It is actually the same idea (smaller scale and different shape) that I had picked up at Translations Gallery, when they were more involved with fiber media, the last time I was in Denver. They had the flat quilts by their featured artist carefully pinned to black fabric covered stretcher bars that were a couple of inches smaller than the quilt. It allowed the quilt to come away from the wall maybe an inch, but I think it gave the piece more of a presence.
 |
| Measuring Fabric |
 |
| Added Notch & Hemmed Edges |
 |
| Giant Yo Yo |
 |
| The Other Side |
 |
| Finished Back |
 |
| Finished Front |
I'll be leading a discussion in my studio on Saturday, September 25. 2010 from 10 until noon on this very subject! It is called Art Quilt Finishing Techniques--A Discussion. I will be talking about lots of different options, what to consider when choosing, pros and cons, and hopefully talking about specific projects that participants bring in. It should be very informative and a lot of fun.
Tuesday, August 24, 2010
2010 Mastery Class with Jane Dunnewold
I have a philosophy about workshops. Sometimes, you don't get what you want, but you get what you need. I really don't have explicit expectations about what I want out of the mastery program, as it was a very intuitive choice, other than to add depth to my work.
But I can assure you that I have learned a ton about dyeing that I clearly needed to learn to make dyeing a fun and effective studio process. I resisted dyeing my own cloth for a long time. To be honest, I really didn't have a good space for it until I got my studio last year. Hind-sight has also shown me that there were other processes I needed to concentrate on.
But now that I have a dyeing process established, I am off and running. I'm dyeing fabric for projects and for studies--which may be my favorite thing yet. I can't seem to get enough of the fabulous colors that I'm making.
There are four things that have improved my process since I started the mastery class.
 1. Hot water. I haven’t really had a problem because circumstances took care of the hot water, but clearly I would have been in trouble without this knowledge. It has been a pretty easy step to add in a boiling water rinse. I now have a dedicated plug-in water kettle.
2. Salt. I really noticed the difference when mixing the black dyes with salt. I see it as a choice that I will probably mostly use.
3. Mixing colors from liquid dye. Previously I would mix colors by adding powdered dye into the water until I got close (by testing on white paper). With this method, I was frequently using a lot more dye powder than I needed, which of course took forever to rinse out. I'm now also mixing liquid dye in larger batches and keeping them in the fridge, which I bring them to room temperature before use.

4. Soaking. The soaking of the fabric to get out most of the dye is working really well. It is amazing though to get to pretty clear water after soaking/rinsing with cold water and then add the hot water and see how much more dye comes out. This has made the dyeing process a lot less hard work.
But I can assure you that I have learned a ton about dyeing that I clearly needed to learn to make dyeing a fun and effective studio process. I resisted dyeing my own cloth for a long time. To be honest, I really didn't have a good space for it until I got my studio last year. Hind-sight has also shown me that there were other processes I needed to concentrate on.
But now that I have a dyeing process established, I am off and running. I'm dyeing fabric for projects and for studies--which may be my favorite thing yet. I can't seem to get enough of the fabulous colors that I'm making.
There are four things that have improved my process since I started the mastery class.

2. Salt. I really noticed the difference when mixing the black dyes with salt. I see it as a choice that I will probably mostly use.
3. Mixing colors from liquid dye. Previously I would mix colors by adding powdered dye into the water until I got close (by testing on white paper). With this method, I was frequently using a lot more dye powder than I needed, which of course took forever to rinse out. I'm now also mixing liquid dye in larger batches and keeping them in the fridge, which I bring them to room temperature before use.

4. Soaking. The soaking of the fabric to get out most of the dye is working really well. It is amazing though to get to pretty clear water after soaking/rinsing with cold water and then add the hot water and see how much more dye comes out. This has made the dyeing process a lot less hard work.
Friday, July 23, 2010
The Invisible Bridge

I want to keep this blog real and on track about my journey of making my living from my art and being abundant, but I just couldn't write about my discomfort anymore. So, here are the cliff notes of the last week (with a happy ending) instead:
Week ago Thursday - Meltdown
Week ago Friday - Decided that the fear is getting in the way of making art, so it is
better idea to get job
Last Saturday - Connected with the employer that I solved the money problem with a
previous time that Chuck quit his job and started sending out resumes
locally
Last Monday - Changed my mind about the previous employer because I feared getting
sucked into making enough money and losing my art more than not having
money. Sent out a couple more resumes locally
Tuesday and Wednesday - More unproductive time not making art
Thursday - Interview for a local part-time job doing light accounting, excel, access, and
organizing -- all the things that I want in a money job right now!
Friday - Start part-time job
I cannot solve all of our near future money needs with this one part-time job, so maybe one foot is on the visible bridge while the other is on the invisible one. That is all I can do right now. I feel like this part of the equation is resolved and my mind is clear to make art. This blog needs some art postings!!
Subscribe to:
Posts (Atom)